Extensible CSS Interface II: CSS Selectors & jQuery
~ 06 March 2008 ~
This is the second article in the four-part series, “The Highly Extensible CSS Interface”. Markup and images for this article:
This second article provides an opportunity to dive deeper into markup and even a little scripting with the intent of educating the less experienced designer/coder, while furthering the knowledge of more experienced readers in the audience.
Before we begin…
Disclaimers! Of course. There are two. One, this interface is optimized for any browser that recognizes a reasonable number of the common CSS2 and CSS3 selectors supported among most browsers today. Yes, I’m speaking to you, IE6. You may kindly excuse yourself from this party. As I mentioned in a comment in Part I, I want us to explore newly supported selectors without inhibiting ourselves with IE6. All of you reading this are smart enough to make concessions on your own for IE6 as your audiences and projects demand. (For starters, consider conditional comments.)
Two, there are a few known “bugs” in the interface for which small inconsistencies will be seen from browser to browser. I’m okay with this and I hope you are, too. I’ve left these bugs in place because 1) I didn’t have sufficient time to polish the interface perfectly when this was first created (nor since), and 2) I’m hoping you’ll consider this a challenge to recommend ways to fix the bugs, thereby improving the final interface.
Moving right along, let’s begin.
Selectors
So what about these newly supported CSS2 and CSS3 selectors I keep mentioning? Well, by “newly supported” I specifically mean IE7 (and now IE8), as Firefox 2.x or newer and Safari 2.x or newer have supported them for some time. Among the most notable are probably min-width and max-width, attribute selectors, adjacent sibling selector, child selector, and alpha-transparency in PNG images.
Lest you’re confused which selectors are which, download a copy of this Selectors Cheat Sheet:

If you’re at SXSW or An Event Apart New Orleans, come grab me for a finely printed copy free of charge.
I’ve made comments throughout the markup and CSS calling out selector examples in this and subsequent code downloads, but I’ll take time here to point out just one of them.
The attribute selector eliminates the need to add a class or ID to an element by referencing any attribute used in the element as a hook: type=, title=, src=, etc. This comes in handy in a variety of situations, but probably the most useful is with forms. Styling elements in the CSS with input {} leads to all elements within the form being styled, when in most cases you’re targeting text fields only, the submit button only, and so forth. You’re then relegated to adding superfluous classes and IDs to do so.
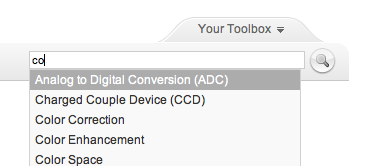
The search field and button, shown in the first image at the top of this article, serve as our attribute selector example:
<form id="search" action="">
  <input type="text" name="search" id="search-query" title="Search" />
  <input type="image" name="submit" src="img/search.png" />
</form>
Here we’d like to modify the input image (search.png) so its vertical alignment is even with the input text field. Normally this would require adding a selector hook, but notice the absence of a class or ID selector within <input type="image">. This is because we can target the image using the type attribute, and we do so like this:
input[type="image"] {
  vertical-align: middle;
  }
Any input element containing the attribute type="image" will be vertically aligned in the middle. In this case, it’s the search button. (Note: The search field requires an ID for the autocomplete plug-in. One could argue we skip the attribute selector altogether and just add the vertical alignment to the search field, as it already has an ID hook. But keep in mind I’m demonstrating possible uses for attribute selectors.)
The attribute selector is one of several CSS2 and CSS3 selectors to be explored, and the brevity of this article doesn’t provide freedom to explore them all. Consider perusing “Newly Supported CSS Selectors in IE7” by John Gallant and Holly Bergevin, as well as this selectors example and accompanying slides (included in the .zip) in which you can uncomment styles in the HTML head one at a time and view the effect they have on the content.
jQuery
Back in December 2005, I predicted the following:
I’ve been able to get by the last few years with my measly JavaScript skills, you know where you just copy and paste existing scripts? Yeah, those skills. That’ll change in 2006. The traditional role of “web designer/developer” will add JS/DOM to the existing XHTML/CSS mix. Those of us with sorry skills will expect to see a copy of Jeremy Keith’s DOM Scripting under the tree this Christmas.
I was a year or two early with my prediction, but by now it’s safe to say we’re required to know at least a minimal amount of scripting as a designer or front-end coder. For those of us reluctant to fully embrace the art of writing JavaScript, say hello to jQuery.
Karl Swedberg and Jonathan Chaffer’s very useful Learning jQuery describes jQuery as a “general-purpose abstraction layer for common web scripting.” I like to think of it as “JavaScript for scripting noobs like me.” jQuery enables you to do the following:
- Traverse the DOM
- Modify the appearance of a page
- Dynamically alter the content of a page
And it allows you to do all this without writing lines and lines of JavaScript.
Let’s pick apart a sample from the demo to understand the components of jQuery. We’ll use the “Dismiss” button in the yellow disclaimer bar at the top of our demo.
Here’s the code we add to the button’s anchor tag:
$('#alert').slideUp('slow');And here’s a description of each component:
$()- The basic jQuery construct (or function) that’s used to select parts of the document. In this example, we’re selecting an element with the ID ofalert..slideUp- A jQuery method, one of many. Methods are essentially a shortcut for lots of JavaScript. It’s pretty obvious the methodslideUpmakes the element we’re targeting (#alert) slide up.('slow')- A pre-defined string that defines how the method functions. In this case, it tells the element to slide up slowly.
This code can be added either inline or in a separate .js file (or dynamically), the latter being the more optimal method. But here’s the real kicker: I didn’t have to come up with any of the code above on my own. The construct, method, and string came pre-built with jQuery. I just had to know I wanted the element to slide up slowly, and then I looked up the appropriate references in the jQuery library that corresponded with the animation and movement I was seeking. Boom. Done.
It’s worth noting jQuery isn’t merely a cheap tactic for adding bells and whistles to an interface, though unwise use of it can thwart its intended utility much like any technology. Rather, jQuery is intended to be a really easy way to add useful interactivity to a site or app. In fact, jQuery is used throughout the interface in this and subsequent demos: jQuery autocomplete plug-in for the search field, the bio’s edit-in-place feature, and the slide up/down animation when clicking Your Toolbox. See project.js and jquery.autocomplete.js in the scripts folder included in the download. (Special thanks to Aaron Barker who wrote a lot of custom jQuery and Ajax scripting for this interface!)
Additional jQuery reading:
- Official jQuery site
- Visual jQuery (a list of jQuery methods)
- Digital Web Magazine: jQuery Crash Course
- Simon Willison: jQuery for JavaScript programmers
- Web Designer Wall: jQuery Tutorials for Designers
- Noupe: 50+ Amazing jQuery Tutorials
Extensibility
We couldn’t close this article without highlighting the series’ theme, that of adaptable interfaces. This article’s demo demonstrates the power of text extensibility throughout the interface. Try increasing the text size (Command/Ctrl + in some browsers), and give it a pass through Google Translate by translating the interface to another language such as Chinese. I plugged Dan Cederholm’s Bulletproof Web Design book in the series announcement, and I’ll plug it again here: Many of the underlying techniques for “bulletproof” text shown in this interface are covered in Dan’s book.
Pay particular attention to the Your Toolbox button. I won’t take time here to break down the markup used for the button, but you can view a button sample and accompanying slides that describe how things work. (These files are also included in the .zip.)
Also demonstrated in this article is resolution dependence, a continuation from Part I. Notice how the width of the search field changes as the browser width expands and contracts. This is done to allow additional space for all text as the width contracts, while increasing the field size for those with larger resolutions. The next article will expose several tricks for resolution dependence that dramatically alter the content and presentation. (Search field width and other resolution-dependent values are specified in /css/1024.css.)
Whew, that was more than enough to cover in one article! Suzanne and I are headed to Austin tomorrow and will hopefully meet some of you in person, and we’ll return to the series next week with Part III.
39 Comments
Stock photography, type, and killer tees. Genuinely recommended by Authentic Boredom.
Thanks for the selector notes! Regarding JQuery - it’s an invaluable resource which every developer should have in there toolbox. Learn it … love it.
Ya, jQuery is pretty much the bomb diggity. I just wrote about how much I love it recently.
Nice Article!
Great article Cameron. Looking forward to part III as well.
I really hate the DOM. I’ve been working with script.aculo.us, and even something as simple as that makes my head hurt.
I like sticking to solid code, thank you very much! I’ll outsource the rest!
Cameron,
Regarding your blurb about the button/bulletproof button, what are your thoughts regarding using & styling button:
instead of input
I’ve had a lot more success styling button as is further explained in this link and I’m wondering why more people don’t use it. Am I missing out?
Also, can you expand on why you chose jQuery library over Mootools or Prototype? I’ve used all and am just curious.
Thanks
sorry, link here:
link to “rediscovering the button”
http://particletree.com/features/rediscovering-the-button-element/
Love me some jQuery. Looking forward to Part III.
Grea t article, I am also wondering why you chose Jquery over prototype? Is it just a preference?
awesome tutorial, Part III == 09/03/2008 ?
Don’t forget to take into account the resize property on the textarea. Us pesky Safari users can get um… creative:
The event_listeners.js script seems to be included only because the resolution.js script needs it. But it’s redundant functionality, since jQuery already gives you event management, right?
So in resolution.js, the lines that set things up (the call to attachEventListener() in line 3) could be moved into your project.js’s document.ready function. You could write it simply as: $(window).resize(checkBrowserWidth()) You could bind it to the window.load event if you want it to run immediately on load.
Now you can delete lines 1 and 3 of resolution.js, and remove event_listeners.js altogether.
…and also, there’s an additional redundant call to addLoadListener() around line 14 of resolution.js. Since that’s handled in project.js’s document.ready setup function, it can simply be removed.
I am also wondering why you chose Jquery over prototype? Is it just a preference?
So, I queried the other 30 designers on our team here at work to help answer this question, and here are some of the reasons why we’ve standardized on jQuery as being our framework of choice:
* Easier to learn as it leverages CSS selector syntax to target elements
* “Sweet spot” for functionality vs size — other libraries offer more functionality (often more than you need) but at twice the file size
* Chaining is the bomb
* (from blind co-worker) Its authors are at least giving some thought to accessibility.
@ Andrew
For the event listeners vs jQuery stuff… I think we recognized the duplication of event handling, but just plain ran out of time. I never really dug into it to see how complicated it was (apparently not very), other things just ended up as priority.
While I am here, I thought I would note that the JavaScript error on the page of “curID has no properties” is due to a section of the page that I’m presuming will be coming up in one of the upcoming articles. So ignore it for now :)
Also on the topic of jQuery authors giving thought to accessibility: http://groups.google.com/group/jquery-a11y
Hi Cameron and group, I’ve been following your series very closely and have added a link to them on my blog.
I’ve been using jQuery for about a year and a half now and on about 15 websites.
JQuery is great for us who don’t know Javascript, it’s easy to learn, lots of plugins and support, and it’s fast and small.
Compared to Prototype, jQuery’s animations aren’t as smooth. You also can’t use Mootools, Prototype, and jQuery together. This is done on purpose by Mootools and Prototype because they would rather compete than play together. So if you found a really cool plugin for Prototype either use it or learn how to write plugins for jQuery.
One thing to mention/add is that jQuery, and probably others, can keep your XHTML code even cleaner for the search engines. Use “wrap” and “append/prepend” to add divs, spans, and anything else you need without dirtying up your code.
Example: sometimes I have to put a bg image over the bg image on the body. If I have a div container holding my content I can have jQuery wrap another div around that container without writing it into the XHTML. Also, when you’re putting images over your text links have jQuery add those spans to the anchor tags then have CSS do the rest.
As a follow up to my last post. You can also use jQuery to get around IE6’s shortcomings by interepreting CSS2 and CSS3 for it. I use this bit of script at the beginning of each project:
$(function() {
// run jQuery code in the markup
$(“code.jquery”).each(function() {
eval($(this).text());
});
// Add the correct quotes for IE6
$(“q, blockquote”).prepend(““”).append(“””);
$(“q q, blockquote q”).prepend(“‘”).append(“’”);
// Add classes to inputs for IE6
$(“input[type=’text’], input[type=’password’]”).addClass(“text”);
$(“input[type=’button’], input[type=’submit’], input[type=’checkbox’], input[type=’image’], input[type=’radio’], input[type=’reset’], button”).addClass(“nontext”);
$(“input[type=’button’], input[type=’submit’], input[type=’reset’], button”).addClass(“button”);
});
Excellent series, thanks Cameron. Particularly good for those of us who are comfy with HTML and CSS but yearn to add a little JavaScript magic without necessarily having the time, inclination or spare synapses to do it the hard way. Also so helpful to read from you and commenters about alternate libraries. jQuery looks excellent, looking forward to getting more familiar with it. Cheers, -Alan
Nice introduction. On the autocomplete form I have to hit the tab key twice to get out of the field. I think it should be once.
I would have to agree with Cameron in this case. jQuery is much easier to use for Javascript noobs and is easier to find help when you have questions too. JQuery allows you to make some fairly advanced widgets in no time by specifying some data and then running a plug-in - Viola!
Mootools on the other hand is geared more towards developers. It is a fantastic library and highly extensible. Mootools is lightweight, quick and powerful - too powerful for the casual user or noob. Their roadmap looks promising, but Cameron’s right, jQuery should be sufficient for most designers.
However, if your skills are up to par, then Mootools provides a lot more bang for your buck. Still, jQuery is the perfect way to handle the task at hand in this article. More so, IMHO, because the syntax is simpler and easier. Great article Cameron, looking forward to the next.
nice article..
“If you’re at SXSW or An Event Apart New Orleans, come grab me for a finely printed copy free of charge.”
I’m at SXSW, where can I find you and get one?
Anand, please come say hi! I leave Monday afternoon. Probably the best way to find me is to follow me on Twitter: http://twitter.com/cameronmoll
I may be in Building Web-Dev Friendly APIs but will tweet where I’m at.
I stalked your twitter and went to the panel but I didn’t see you there :(
Have a safe trip back!
Hi thanks for the articles…
I used jQuery in some of my projects…
Very nice article.
thanx Cameron for article.
On the subject of accessibility, even though the search input doesn’t have a visible label on screen, it should still have one in the source for screen reader users. And the image input should also have an alt attribute, again for AT users and for those with images off.
jQuery has functions that make sense, are easy to remember and jQuery is lightweight. Everything you need is in 1 file. There are tons of plugins also. It makes writing JavaScript easy and fun.
Hey. I’ve recently come across your wonderful series and I was wondering if you could possibly make available IE6 compatible versions of the style sheets. I’m very new to CSS and I’m having a hard time making it compatible.
Thanks in advance.
Robin, I’ll not be including any IE6 concessions in this series. I’ll rely on readers to make concessions on their own, allowing the series to focus on what’s possible with browsers that support standards well without becoming bogged in the mire of those that do not.
I see…
Well, thank you nonetheless.
jQuery 1.2.3 is out and the livequery plugin has been updated, which gets this working sweeter for me.
JQuery offers many features for bridging the gap between inferior explorer and other brothers.
I think this set up would benfit from the use of jsMin & cssTidy, which when not set to debug collects and array of javascript and css files and minifies or tidys the collected css or js creating files to be cached. When in debug mode minification and tidy does not take place, so that the project can be better debugged.
I am adapting this example to use blueprint and ui tabs & treeview (jquery) to work within a cake app. Have made some progress but still more to make. Its very solid good work, and an inspirartion. thanks - S
Another great installment, as usual!
Just wanted to make a suggestion for a small way to improve a piece of the interface. I noticed that the “Dismiss” link only works when JavaScript is available. If that’s what you intended, it would be beneficial to generate the link unobtrusively with JavaScript, which is fairly straight-forward to do. That way, you don’t present an option that seemingly doesn’t work for users with JavaScript disabled.
Ahm..I have been stuyding Css for quite some time but I still don’t know much about this Selectors and Jquery. I guess i need to study more of this..
Thanks!
I hope I could understand all of those information..i would be back after i learn more about that!
Jquery is a fantastic addition to CSS and HTML skills. You still need to understand javascript at least a little though. I often find myself reaching into the $’s array object to manage things - particularly when debugging. Without an understanding of the underlying javascript then you can still get into trouble with jquery - as user friendly as it is. I also want to put my weight behind the idea of graceful degradation. Use jquery to hide content onload, as well as reveal it on user action, so that all your content is accessible for those who don’t have javascript turned on
I think this set up would be great from the use of jsMin & cssTidyOn the subject of accessibility, even though the search input doesn’t have a visible label on screen, it should still have one in the source for screen reader users. And the image input should also have an alt attribute, again for AT users and for those with images off.
Authentic Boredom is the platitudinous web home of Cameron Moll, designer, author, and speaker. More…

Full-time and freelance job opportunities. Post a job...
A selection of fine reading, available for a limited time only:
- Recent job listings, testimonials, and 100th Kiva loan
- The ISO50 Field Guide to Color Management
- Upgrading the hard drive and memory in a refurbished 13" MacBook Pro
- Inspiring type: Libro di M. Giovambattista Palatino
- Randomness, vol. IX
 CSS Mastery: Advanced Web Standard Solutions A solid round-up of indispensable CSS design techniques by Andy Budd, Simon Collison, and Cameron Moll.
 Mobile Web Design A guide to publishing web content beyond the desktop. Tips, methodology, and resources. Now available.
![]() Letterpress Posters The unassuming beauty of a freshly letterpressed print.
Letterpress Posters The unassuming beauty of a freshly letterpressed print.
![]() That Wicked Worn Look. Techniques for that worn, aged, distressed look.
That Wicked Worn Look. Techniques for that worn, aged, distressed look.
![]() Mister Retro Machine Wash Filters Turn the dial to “Instaworn” with these filters.
Mister Retro Machine Wash Filters Turn the dial to “Instaworn” with these filters.
![]() Blinksale Dive in and enjoy shamelessly easy invoicing from Firewheel Design.
Blinksale Dive in and enjoy shamelessly easy invoicing from Firewheel Design.
![]() Basecamp My preferred web app for internal and client project collaboration.
Basecamp My preferred web app for internal and client project collaboration.
![]() HOW Conference Austin, June 24–27. Pentagram, Adobe, P&G, et al.
HOW Conference Austin, June 24–27. Pentagram, Adobe, P&G, et al.
![]() Web Design World Seattle, July 20–22. Practical sessions on web design.
Web Design World Seattle, July 20–22. Practical sessions on web design.
![]() Stimulate Salt Lake City, September 2009. Entrepreneurship and design conference.
Stimulate Salt Lake City, September 2009. Entrepreneurship and design conference.
Linkage:
Follow me: ![]()
1 Dave Simon ~ 06 March 2008
Interesting article, Cameron. I have used a lot of fudging to get by as a Mootools hacker for many sites recently, but have been looking into jQuery as I see more and more of it.
I look forward to Part III.